Faculty FAQ-Moodle
Course Administration
Once you login to Moodle, you can view your courses on the Home page, Dashboard, or My courses page. You can navigate to any of these pages using the tabs in the Site navigation bar at the top of the page.
Home shows announcements and a list of your courses.
Dashboard shows a calendar, timeline of upcoming events, as well as links to your courses.You can customize this page and your view of courses.
My Courses has only the list of your courses.
- Go to the Settings tab in the Settings bar at the top of the course page (beneath the course title).
- In the General section, use the dropdown menu next to Course Visibility and select Show.
- Scroll to the bottom of the page and select Save changes.
- Select Profile from the User menu (beside your name in the upper right corner of the window).
- Choose Edit Profile under the User Details section.
- Edit any profile preferences.
- Click Update profile at the bottom of the page to save changes.
First make sure the courses are the same format. You can go to the Settings tab in the Settings Bar at the top of the course page and change this semester’s course to have the same format as the previous course, then follow these steps to import content.
Enter the course into which content will be copied.
-
Go to the More tab in the Settings bar at the top of the course page and go to Course Reuse.
-
Select Import from the dropdown list at the top left of the page.
-
Select the course you wish to import from and click Continue. If the course is not visible type in the semester (e.g., Spring 2023) in the search box and then select the appropriate course.
-
Select the backup settings you want to import, then click Next. By default, all elements of the class are checked to be included in the import. If you wish to make changes uncheck the appropriate boxes then click Next. Note: The current course will already have an Announcements Forum and Course Evaluation so you do not have to import those from the previous course.
-
Review and confirm your selections, then click Perform Import.
-
Click Continue to return to the course.
If you need to move items to new locations, open the Course Index on the left side of the page to click and drag an item and drop it in the new location.
NOTE ABOUT IMPORTING AND THE GRADEBOOK
If you use grade items in a course and wish to replicate the gradebook, do not uncheck any elements during the import process. You can delete any duplicates like Announcements once the import completes. The course must be imported exactly as it was from a previous semester to replicate the gradebook.
- Go to Participants in the Settings bar at the top of the course page.
- Click the Enroll Users button.
- Type in the student’s name in the search field.
- Click on the name of the person in the drop down search results.
- Click the Enroll selected users and cohorts button.
- Go to Participants in the Settings bar at the top of the course page.
- Click the Enroll Users button.
- Type in the student’s name in the search field.
- Click on the name of the person in the drop down search results.
- Select the role of non-editing teacher (teaching assistant) from the Assign role drop down list.
- Click the Enroll selected users and cohorts button.
If you need to add an additional teacher to your course please contact [email protected].
Course Management
- Open the Block Drawer on the right side of the course page and choose Compose Course Message in the QuickMail block.
- Select individual students from the drop down list of recipients or choose Student (Role) to send to all students in the class.
- Enter a subject for the message (required).
- Enter in a message for the body of the email (required).
- Choose to Send message as Email or Moodle Message.
Options include file attachments, timing message delivery, signatures, inserting user data fields in the message, or receiving a send report.
To create an attendance activity in your course:
- Open your course and turn the Edit mode toggle on in the upper right corner.
- Click Add an Activity or Resource below any topic (the general topic at the top of your course is a recommended location).
- Select Attendance from the Activity Chooser.
Configure the settings for your events on the next page. This includes (optionally) renaming Attendance to something else (some instructors use "Attendance and Participation," and assigning a grade. If you want to manually enter a grade or not assign a grade at all, set the grade type to "none". Click the Save and Display button to create and view sessions.
How Attendance Grades Work
Attendance uses the PLEA model by default for tracking attendance. PLEA stands for Present (2 points), Late (1 point), Excused (1 point), and Absent (0 points). If you wish to modify the points for each, go to the Status set tab in the Attendance activity to make changes. Under this model, 2 points = 100%, 1 point = 50%, and 0 points = 0%. These grades are automatically scaled to the value you set in the Attendance settings (this is usually 100 points). This means that if you enter attendance for one class session, and the student is marked present, their grade will appear as 100 in the gradebook (even though they've technically only earned 2 points). There is currently no way to calculate this grade as a running total.
Adding Sessions to the Attendance Activity
Click the Add session tab at the top.
From here, you can create all of your class sessions at once using the steps below. It's worth noting that courses rarely meet every single day they're scheduled to due to holidays, breaks, and closures. It is still easier to create all of your sessions as if you were meeting consistently, then delete the extra sessions later.
- Under the Add session section enter the date and time of your first class session (note that it is a 24-hour clock).
- Under the Multiple sessions section check the box to "Repeat the session above as follows" and check the the days of the week your class will meet.
- The sessions will repeat every 1 week.
- Next to Repeat until, choose the last day your class will meet.
- Click the Add button to finish.
You will see a message that the sessions were created successfully.
You can delete any session when the class will not meet by clicking the trash can icon to the right of the appropriate date.
To take attendance:
- Open the Attendance activity.
- Locate the desired date and click the right facing triangle.
- Select the appropriate radio button for each student- Present/Late/Excused/Absent
(displayed as P L E A)
- Instructor Tip: Most of your learners are likely to be Present, with only a handful being Late, Excused, or Absent. If you click the P in the header row, all students will be marked Present. You can then update just the students who were not Present before saving.
- (optional) Leave written feedback in the Remarks column
- This feature works well for you to add internal notes related to a student's absence.
- Once finished, click the Save attendance button near the bottom of your roster.
Drag and drop method
The easiest method for adding a file is to drag and drop the file directly into the course. See a demonstration of the drag and drop method.
Add an activity or resource method
An alternative method is to upload a file using the Add an activity or resource link. See a demonstration of uploading a file.
Moodle has a limit of 100 MB per file upload. If you have a file larger than that, upload it to OneDrive and then share it and include the share link in Moodle.
Quizzes
Creating a new quiz is a two-step process. In the first step, you create the quiz shell. This includes setting options that affect when and how the quiz is administered to students. In the second step you add questions to your quiz.
Step One - create the quiz shell
Start with Rapidly creating a quiz or Explore quiz settings to create the quiz shell.
Step Two - add questions to the quiz
-
- Open the quiz, then click the Questions tab in the Settings bar at the top of the course.
- Click Add on the right side of the page, then select "A new question".
- Select a question type from the list then click the Add button. (You can also double-click the name of the question type.)
- Fill in the requested information for the question type you chose.
- Click Save changes at the bottom of the page.
Alternatively, you can format quiz questions in Word and then import them into the question bank. See Formatting Quiz Questions for more information.
- Open the quiz from the front page of the course.
- Select the Results tab
- Check the box to the left of the student’s name.
- Select the “Delete selected attempts” button toward the bottom of the page.

To see a list of all questions that need grading-
- Open the quiz from the main page of the course.
- Select the Results tab from the Settings bar at the top of the course page.
- Choose Manual grading from the drop down list at the top left of the page.
- Open the quiz from the main page of the course.
- Select the More tab in the Settings bar at the top of the course page and select Overrides.
- Choose Add user override.
- Begin typing the name of a student then select the name of the student from the drop down list.
- Enter a new time limit and/or date and then save.
Safe Exam Browser is a web browser-environment to carry out online-exams safely. The software changes any computer into a secure workstation. It regulates the access to any utilities and prevents students from using unauthorised resources.
- When creating or editing a quiz expand the Safe Exam Browser settings.
- Change Require the use of Safe Exam Browser to Yes-configure manually.
- Leave Show Safe Exam Browser download button to Yes.
- Leave Ask user to confirm quitting to Yes.
- Leave Enable quitting of SEB to Yes.
- All other options can be changed according to your preference.
- Click Save and return to course at the bottom of the page.
Once an attempt is made on a quiz the Safe Exam settings for a quiz cannot be changed.
There are instructions for students to take a quiz using Safe Exam Browser in the Moodle FAQ of the For Students menu in Moodle. Please direct them to that resource when requiring the use of Safe Exam Browser.
Assignments and Discussions
To edit due dates for ALL activities on one page
- Open the Reports tab from the Settings bar at the top of the course page and choose Dates.
- Click each week/topic to open it or click Expand/Collapse all to open/close all weeks/topics.
- Change any due dates and/or times.
- Save your changes.
To edit dates for ONE activity at a time
- Turn the Edit mode toggle on at the top right of the page.
- Click the vertical ellipses to the right of an assignment and choose Edit settings.
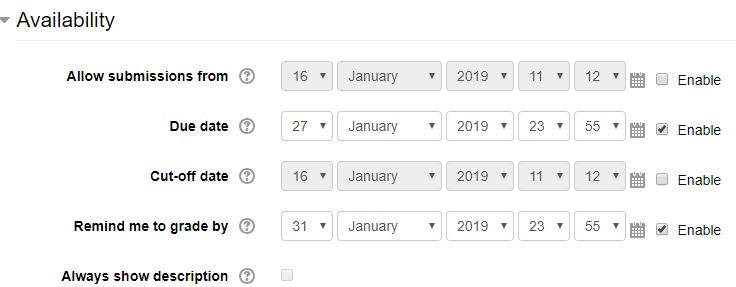
- In the Availability section select the appropriate options for the assignment.
4. Scroll to the bottom of the page and select Save and return to course.
- Turn the Edit mode toggle on at the top right of the page.
- Choose Add an activity or resource in the appropriate section.
- Select Assignment from the Activites list.
- Enter a name and description.
- Change any other settings desired such as availability and grade.
- In the Turnitin plagiarism plugin settings set Enable Turnitin to Yes then select any other options you want.
- Choose Save and return to course.

- Navigate to the Announcements forum within the course and click on its title.
- Click the Add discussion topic button.
- Enter a subject for the post.
- Type in a Post (message) for the forum.
- Click the Submit button to complete.
Optional: Use the advanced editor for additional options for the forum such as adding attachments.
When a user is subscribed to a Forum it means that they will be sent email copies of every post in that Forum (posts are sent about 30 minutes after the post was first written). Users can usually choose whether or not they want to be subscribed to each Forum. However, if a teacher forces subscription on a particular Forum then this choice is taken away and everyone in the class will get email copies. This is especially useful in the Announcements forum and in forums towards the beginning of the course.
Grades
1. Choose an aggregation type for your course. Look at the grade distribution from your syllabus and then choose one of the following aggregation types:
- Natural - Grades are added together to produce a sum (total points).
- If you create categories to organize the gradebook, set each category's aggregation to Natural.
- Simple weighted mean of grades - Grades are added together to produce a sum, and then the sum is divided by the number
of possible points.
- If you create categories to organize the gradebook, set each category's aggregation to Simple weighted mean of grades.
- Weighted mean of grades - Grades are multiplied by weights, and then added together to produce a sum, and then the sum is divided by the total
of all item weights. This method allows weights to be assigned to individual grade
items or categories. As an example, you could have a quizzes category worth 20% of
the course grade, an assignments category worth 35%, a final exam worth 10%, etc.
- Once you select this aggregation type, a Weights column will appear where you will then enter weights for each grade item or category.
- If you create categories to organize the gradebook, set each category's aggregation to Simple weighted mean of grades.
2. Add activities such as assignments or quizzes in the course (mentioned above) to automatically populate the gradebook. Alternatively, you can manually add grade items and optionally add categories to the gradebook to organize and populate the gradebook.
For any questions about setting up the gradebook, contact [email protected].
Grader Report
Click the Grades tab from the Settings bar at the top of the course page and choose Grader Report from the drop down list at the top left of the page.
Gradebook Setup
Open the Grades tab from the Settings bar at the top of the course page and choose Gradebook setup from the drop down list at the top left of the page.
User Report
To view grades from a student perspective select the User Report from the drop down list at the top left of the page. Select the name of a user from the drop down menu toward the top of the page.
One method you may want to use to grade assignments and especially Open forums is the Open Grader. Rather than going to the assignment/open forum first and grading from there you go directly to Open Grader from the Open LMS tab on the Settings Bar at the top of the course. This allows you to grade using a rubric (if one has been attached to an assignment) as well as add optional feedback. It also provides a summary of the total number of posts and responses each student has made in an open forum.
- From the Settings bar choose Open LMS then Open Grader.
- Select the name of the assignment/open forum from the drop down list at the top
- Click Grade with Rubric if a rubric has been created for the activity.
- Once the grading is complete click Save or Save grade and next at the bottom of the rubric
Refer to the Library's LibGuide on Artificial Intelligence and Generative AI for teaching resources and AI Detectors.
You will assign the Incomplete Student role to allow a student to work in a course that is hidden for other students. You still need to adjust due dates, if necessary, for a student to complete assignments.
- Click Participants on the Settings Bar at the top of the course page.
- Click the pencil icon to the right of the word Student in the Roles column.
- Choose Incomplete Student from the drop down list then click the Save icon. The student will then have a role as a Student and an Incomplete Student.
- Once the student completes work in the course, go back to Participants, then remove the Incomplete Student role by clicking the x next to Incomplete Student and then clicking the Save icon. If the role is not removed the student will continue to see and have access to the course.
Mobile App
The mobile app for Moodle is called OpenLMS.
Follow the link for Get the Mobile App in the question mark at the bottom of any page in Moodle or go directly to https://www.openlms.net/open-lms-mobile-app/
Download and install the app from the App Store or Google Play.
To log in to the app type in https://moodle.obu.edu when prompted for your site.
Use the first part of your email address for the username and then your email password (not the INFO password)
Teams Meetings
- Go to https://outlook.office.com.
- Go to the calendar and click the New event button.
- Add a title for the meeting.
- On the invite attendees line, type in seqXXXX (if the sequence number of your class is less than 4 numbers, put zeroes in front of the number so that there are 4 characters) and a drop down menu with your class name will appear. Select that.
- Set the date and time the class will meet.
- Toggle the Teams meeting button to on.
- A description or attachment is optional
- Click Send. This will send an email to all the students in your class with a Teams meeting invitation. It will also show up on your calendar for the designated date and time.
Go to the Outlook or Teams calendar to open and start the meeting.
First, add the Microsoft block to your course
- Turn the Edit mode toggle on at the top right of the page.
- Make the course visible from the Settings tab in the Settings bar at the top of the course page.
- Open the Block drawer on the right and choose Add a block at the top of the drawer.
- Choose Microsoft from the list of blocks.
- Click Log in to Microsoft 365 in the Microsoft block (use your Ouachita email and password).
- Use your phone to verify your login via two-factor authentication.
- Return to your course and click Configure course sync in the Microsoft block and change the Sync option from Disabled to Enabled then Save changes.
The Microsoft block will report that the course is configured to be connected to a Team, but the group creation is pending. (A Team must be created before adding a Teams meeting.) Once a Team is created you will receive a notification via Teams that the Moodle Integration added you to the class (this process takes approximately 10 minutes.) A course must be visible for this process to complete.
Next, add a Teams Meeting
- Choose Add an activity or resource in the appropriate section of your course.
- Choose Teams Meeting from the Activity chooser.
- Enter a name such as Teams Meeting (or whatever you choose). In the grade section set the grade type to none if you do not want a grade associated with the meeting.
- Click Save and display at the bottom of the page.
- Click the +New meeting button at the top right of the page
- Add a name for the meeting.
- Choose Add entire class to add all students in the class to the meeting.
- Select the Start date and Start time as well las the End date and End time.
- Select options for repeating the meeting if needed.
- Click Send. Students will receive an invitation to the meeting.
You can start the meeting from Moodle, Teams, or your Outlook calendar.